Yield: 2 servings
Time (Start to Finish): 45 min
Ingredients:
1 Tbsp butter
½ med yellow onion
salt and pepper
3 cloves garlic
½ cup pine nuts
2 cups asparagus
1 lemon, juiced
Directions:
1. Be patient with caramelizing onions…I promise you, if you are patient, they will make any dish 10 million times better.
2. In a pan on med heat, add the butter and the onions chopped into 1 inch pieces, salt and pepper.
3. Let cook, stirring occasionally, for about 20—25 min or until brown and caramelly.
4. When they are almost done, add the chopped garlic and pine nuts and stir until they are almost cooked. Add more salt and pepper if needed.
5. Add the asparagus chopped into bite size pieces, and stir until the asparagus is almost cooked, about 3-5 min.
6. Add the lemon juice last, stir, and add salt and pepper if needed. Serve hot.
Rating: 4 strawberries
Notes: Really, anything with caramelized onions is good. This dish is just classic, and the onions, lemon and pine nuts add SO much!! Oh, and its 60 days down! CRAZY! I just ate this whole bowl of asparagus; thank god I don’t have a boyfriend, haha. SO good. I could really just eat all the stuff besides the asparagus, but its there to make the other stuff ok to eat. Oh, and thanks to my girl Sarah Mayo in boston for chatting with me the whole time I made this, and even shared with me another asparagus recipe which I am sure to tweek and throw up here. Enjoy peeps!
Welcome to my Blog for Cooks, Recipe Hunters, and Annie Fans!
Tuesday, September 29, 2009
Day 59: Pear Applesauce
Yield: 2 servings
Time (Start to Finish): 25 min
Ingredients:
3 small apples, any kind
3 small pears, any kind
½ cup water
¼ cup brown sugar
½ tsp cinnamon
2 scrapes/sprinkles nutmeg
1 lemon, juiced
Directions:
1. Cut apples and pears into bite sized pieces. I left the skins on, but feel free to take them off
2. Put all the ingredients into a pot on med heat and cook until the liquid goes away, about 20 min.
3. Stir as much as you can, and keep covered for half of the time.
4. When it is almost done, take a potato masher and smash it into pieces. Smash until the thickness you desire
5. When done, serve hot, cold, on toast, however. You know its done when most of the liquid is gone and it is soft.
Rating: 3.5 strawberries
Notes: Welcome to autumn! I know it started a couple days ago, but I really felt it today. It was that crisp, leaf rustling kind of day that only fall has to offer. What would be more perfect than to wake the roomies with smells of cooking apples and cinnamon. Travis, my star eater, moved out today…it was sad…I wish I could have cooked something more to his liking, but, I will be sure to cook for/with him again…I hope Maggie’s house smells as good!! This recipe is so easy!! Really, its so simple I don’t know why I never made apple sauce before! And the pears add a nice sugary texture. You must try it, hot or cold, it will make you close your eyes and say, ‘mmmm….’ Oh..btw…the pic for today almost got deleted when my computer crashed, so its not the best of qualities…today I am a computer genius, I don’t know about future times, but today, I rocked the nerd…
Sunday, September 27, 2009
Day 58: Peach Pluotcicles
Yield: 2 ice cube trays
Time (Start to Finish): 20 min + freezing time (4 hours)
Ingredients:
1 med size yellow peach
3 med size pluots (a plum apricot fruit hybrid)
2 limes
toothpicks/sticks
sugar if too tart (I didn’t add any to mine
Directions:
1. Make sure ice cube trays are cleaned and ready. You can use any shape or popsicle molds. I am poor and don’t have any.
2. Peel and slice the peaches and pluots. Make sure both are ripe. It is all about the fruit on this one.
3. Place them in the blender, add the juice of both lemons and blend until smooth.
4. Taste it at this point. I wanted mine a little tart, but if they are too tart for your taste, feel free to add a little sugar to soften the flavor.
5. Pour through a strainer to get out all the pieces. I actually left a little skin on the pluots and after it was blended and strained, I put it onto the mixture. I wanted a little texture, but not huge chunks.
6. Pour into the ice cube molds and place sticks or toothpicks into each cube. Heres a trick. After you pour in the mixture, cover the tray with plastic wrap and poke the toothpick through the plastic so that it stands up in the center! Cool huh? My trays had long shaped cubes, so I just put the sticks on the side.
7. Place in freezer for about 3-4 hours until chilled and remove from the tray NOT by pulling the toothpick. Use a knife on the side. Pulling the stick may pop the stick out.
Rating: 4 strawberries
Notes: it was a hot Sunday here in San Fran, and this was a delightful way to cool off. I got the idea after attending the most incredible farmers market a couple weeks ago, the ferry building. I had a plum lime popsicle, and my heart was forever stolen. It was tart, crisp and yummy. These are tart in memory of that, and I like them that way, but again, you can adjust the sweetness with a little sugar. Right now though, mine have No Added Sugar! Coolness!! Enjoy and feel free to try it with different fruit combinations.
The Julie/Julia Story
Ever since I began this blog and I explain my mission statement to people, at least half the time I am compared to the movie Julie/Julia. I roll my eyes at the question, ‘so have you seen that Julie movie?’ and fight, ‘no I haven’t, and my tale is VERY different than hers! Here is why…’ and I almost reached the point of not seeing the movie out of stubbornness. I don’t like being compared to things, I think, because it makes me feel not so special, but I need to change the way I think about that. I need to stop caring so much what other people think, and just enjoy the things I enjoy for the simple sake that I enjoy them. I also need to stop fighting the battle of being compared to the movie Julie/Julia. The reason people compare me is because I am doing a cooking blog with a year deadline, and yes, those things are the same. Its ok to be compared to something in pop culture, and actually, the more I type the word compare, the more I see its not that I am being compared to the movie necessarily, but just people think of the movie and mention it as something to say or something I might like in case I haven’t heard of it. I need to learn to nod my head, and just say, ‘no, but I have heard of it…very interesting tale she tells.’
Well, as of last night, I saw the movie Julie/Julia, and although I have both positive and negative feelings for it, I remind myself that it is just a movie, and yes, my blog and life are very different than theirs. I wrote a long essay I was going to post comparing myself to the movie, the positives and negatives, but then I realized, its ok. That doesn’t need to be discussed. It is what it is, I am who I am, and that is freaking awesome.
The movie did influence the idea I had to do this project. It helped me hone in on the specific idea, and for that I am grateful to the movie. The real influence though, besides my love of cooking and sharing, was Paleo, the musician (his website is below). For one year, everyday, he wrote and recorded a new song and posted them for free on his website. Incredible, yes? Yes. THAT is who inspired me… Music was his art, and food is mine. I wanted to share my art with the world.
Projects like this are hard. Lots of people try and start them, taking a picture every day, even simple things like running once a week, and so much of the time they, and myself, let these things fall by the wayside. I am sticking to my project and I am going to rock the house with it. I love when friends write me or call and tell me they made something I posted. It melts my heart, and even if this project becomes nothing more than that, I feel success. THEY inspire me and keep me going. Until then, eat, eat, eat, and look forward to come crazy things I have cooking up…!
Saturday, September 26, 2009
Day 57: Cinnamon Bread French Toast
Yield: 3 slices, I serving
Time (Start to Finish): 20 min
Ingredients:
3 slices cinnamon bread
1 egg
½ cup half and half (haha, half a cup of half and half)
¼ tsp nutmeg
2 Tbsp butter
1 small apple
¼ cup granulated sugar
maple syrup
Directions:
1. Preheat a skillet pan to med high.
2. In a shallow bowl, mix the egg, half and half and nutmeg with a fork or whisk.
3. Add 1 Tbsp butter to the pan. Dip the bread in the mixture, coating both sides, and then put on the pan.
4. Cook each side until brown. It will cook fast from the sugar in the bread, so stay near it.
5. In the meantime, cut up the apple into small pieces. I left the skin on but you can take it off if you want.
6. When the toast is done, take it out and put it on your plate.
7. In the hot pan, add the other Tbsp of butter, the apple pieces and the sugar.
8. Stay with it and stir until the apples are cooked and it is caramelly and wonderful looking. It takes maybe 1 or 2 minutes.
9. Pour the mixture over the French toast, then pour syrup on top, and sit down before you take a bite, because it is gooood!
Rating: 4.5 strawberries
Notes: Why didn’t I think of this before! It is SO yummy, how can you ever eat French toast the same again!? (Unless you eat my chai French toast, so so good and different) This was a great way to start the day, especially one where I was feeling a little sick and low…and for no reason. And it made the house smell with such good flavors; it got everyone stirring…I love doing that I must say. There is nothing like starting off other peoples days with smiles. The day went to kind of poopy fast (with occasional burps of yummy French toast to make it ok!) and then I saw Julie/Julia. I will post a blurb about that since I am so often asked, ‘have you seen Julie/Julia? You sound just like her.’ In some ways I am, I have a blog, it is about food, but it is quite a different take. THIS post though, is about kick butt French toast! I love French toast, and I love cinnamon bread. This one I got was the gooey kind, so when it cooked, it crisped. Yumtown. (oh, and my spellcheck just capitalized Yumtown like it is a real place…I now have hope that it is…)
Day 56: Yummy Shortbread Cookies
Yield: 15 cookies
Time (Start to Finish): 45 min
Ingredients:
½ cup butter, softened
½ cup powdered sugar
½ tsp vanilla
1 ½ cup flour
1/8 tsp nutmeg
2 Tbsp milk
sprinkles
Directions:
1. Make sure the butter is nice and soft.
2. In a bowl, mix the butter and the powdered sugar (SIFTED) until smooth.
3. Add the vanilla, flour, and nutmeg and mix with your hand until it is blended and forms a ball
4. In a piece of plastic wrap, place the dough and roll into a log (make the diameter the size you want the cookies to be) and place in the fridge for about 15 min or until firm.
5. Preheat oven to 350F.
6. Slice the cookies to the thickness you like with a sharp hot knife (you can make it hot by dipping or running in hot water and then drying it off and slicing) I cut mine about ½ inch thick
7. Place on a lined sheet pan. You can fix their shape with your hand. You can also make this dough a roll and cut out.
8. Take the milk and with your finger and wet the top of each cookie and then sprinkle on the sprinkles!
9. Bake at 350F for 15 min or until barely browning on the edges. Let cook, and enjoy with a cold glass of milk.
Rating: 4 strawberries
Notes: What better to do after going to the dentist and getting a perfect check up than make cookies! They said I had perfect teeth, and I giggled to myself remembering I ate candy for breakfast…I do take good care of them though. I made these in another guest kitchen, my parents, and although it looks lovely from the outside, let me tell you, it is a chefs test. The oven is off in temp and level, she only has one sheetpan, her whisk has 3 wires, and trying to find a knife is like pulling teeth…it’s a wonder the meals I see come out of there from her…I don’t know how she does it! Needless to say, my dad loves shortbreads, so I made these for him, and he could barely wait for them to come out of the oven! It was a wonderful night of laundry, House, burgers, cooking, and laughing. I love having them close. Add whatever color sprinkles you like…these were all my mom had (oh, I HATE those little round colored sprinkles…I HATE THEM, but these sugar flakes I like).
Day 55: Cheesy Garlic Bread
Yield: 4-5 servings
Time (Start to Finish): 20 min
Ingredients:
¾ cup parmesan cheese
1 15 inch sourdough loaf
1 tsp salt
1 tsp garlic powder
1 head garlic
1 ½ sticks butter
Directions:
1. Preheat oven to 400F or to broil if you can figure it out. If you broil it, place the rack low to the bottom of the oven
2. Chop up the garlic head (which is one while white thing of garlic, deskinned) into little pieces and throw in a sauce pot. Also add the butter, garlic powder and salt.
3. Melt the butter mixture until just melted and barely begins to boil.
4. Take the bread and cut longways like making a big sup sandwich. Also cut into pieces, but don’t cut all the way through so you can tear off a serving.
5. When the butter is ready, spoon it or brush it on the bread making sure every bit it covered in buttery garlic goodness. Make sure to use every chunk of garlic
6. Take the parmesan cheese, grated, and put on top of the bread, also making sure it is even (you can toss the cheese with some spice if you want)
7. Bake on a sheet pan with foil in the oven until it begins to brown. Make sure not to overbake, so stay in the oven and keep an eye on it!
Rating: 4.5 strawberries
Notes: This dish is best served with good friends, good pasta, and season premieres of great shows. I had my cheesy bread with my dear gal pal lucy, a delicious meal she made of fettuccini alfredo and zucchini, and a season premier of greys anatomy. It was a classic night, and the bread fit right in. Oh, and thanks for the kitchen lucy! Its always nice doing guest kitchen appearances. let me just say, we ate a lot of garlic, so maybe we should have watched twilight or true blood, but that’s ok! Thanks lucy for the help! I love this bread, and I suggest getting a thick nice loaf, baguettes just are too thin and get too crispy. You can also just leave the cheese off and have yummy classic garlic bread…or leave the garlic out and just have cheesy butter bread…or just eat bread…but then…is it still my recipe? Sorry…I was a philosophy major…ill be thinking all night now…Enjoy!
Day 54: Black Tea Panna Cotta
Yield: 6 ramekins
Time (Start to Finish): 30 min plus overnight
Ingredients:
1/3 cup whipped cream
1 .25 oz pack powdered gelatin
2 ½ cup half and half
½ cup sugar
2 black tea bags (English breakfast)
Butter cookies
Directions:
1. In a saucepan, heat the half and half, sugar, and tea bags. Make sure not to poke the tea bags like I did or they will break open. Heat it until almost boiling, but try not to boil, and if you do, turn it down super fast.
2. In a separate little bowl pour the whipped cream. Sprinkle over the top of it the gelatin and let sit
3. Once the gelatin has mixed with the cream, and the tea milk had heated up to an almost boil, pour/scoop the gelatin into the cream and whisk for about 30-45 seconds until dissolved.
4. Take off heat and pour into ramekins leaving enough room at the top so when you move them to the fridge they don’t spill.
5. Cover with plastic wrap and let sit over night or until they become jell-o like.
6. Serve with little cookies like you would a hot cup of tea. They taste better with the cookies.
Rating: 4 strawberries
Notes: if your tea bags break like mine did, throw the mix through a strainer to get out as many pieces as you can. Small ones are totally ok. I LOVE panna cotta, which as you can see is an Italian gelled cream. If you want, feel free to mix up the half and half to whipped cream to make it thicker and more delicious, and add a little but less gelatin to make it less jell-o like and more like whipped cream. Yum yum yum. You can flavor with most things, but I like black tea because I always drink my English breakfast with a bit of cream. Reminds me of my traveling through Europe. It was my comfort drink for sure. You can make it in the morning and it will be ready by evening, but there is no real rushing of the setting time, so be patient.
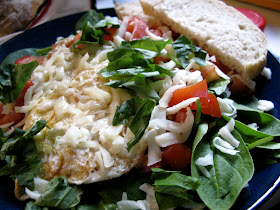
Day 53: Egg “Salad”
Yield: 1 serving
Time (Start to Finish): 10 min
Ingredients:
1 cup spinach
½ tomato
2 over easy eggs
2 basil leaves
½ cup shredded mozzarella cheese
garlic salt and pepper
olive oil
3 pieces toast
Directions:
1. Cook on a skillet 2 eggs the way you want them. I like them over easy and with a little garlic salt and pepper
2. On a plate, place the cleaned spinach and dress with a little olive oil, garlic salt and pepper
3. Add the tomato cut up, I like heirloom
4. Add the basil, which I like to tear instead of cut for this, so its nice sized chunks.
5. Add the eggs over the salad at this point
6. Add the cheese so that it is on the warm egg and will melt a little bit, and then add more salt and pepper if needed.
7. Toast the pieces of bread with a little oil and nothing else. The salad will be flavorful enough, and enjoy for breakfast!
Rating: 3.5 strawberries
Notes: Like my play on the egg salad?? HAHA, it’s a salad with eggs, not a mayo egg salad!! I am so funny and tricky. No seriously, I must say, this is my most rushed meal yet. I didn’t have much time, and I had stuff to use in the house, so I just busted it out. It was SUPER yummy, and it felt really good to eat a salad for breakfast, but kinda on the boring side. Fresh ingredients a must and as always make any dish better, and its nice to know I can make something like this before sending myself off for work. You can do the same! Salad for breaky! Amazing!!!
Monday, September 21, 2009
Day 52: Shepherd’s Pot Pie
Yield: 1 casserole (serves 4)
Time (Start to Finish): 45 min
Ingredients:
2 cups potatoes
1 cup mozzarella, shredded
half and half (about ½ cup)
garlic salt
1 can corn kernels
1 ½ cup broccoli
2 cups fresh spinach
1 med carrot
1 stick butter
½ cup flour
2 ½ cups vegetable broth
salt and pepper
garlic salt
Directions:
1. Preheat oven to 350F
2. Skin and boil potatoes until tender, and put them through a ricer or mash them with a potato masher
3. Add the mozzarella, garlic salt, and half and half until they are creamy, spreadable, and taste delicious!
4. In a separate pot, melt the butter and once melted add the flour, salt and pepper
5. Whisk until smooth and cook for about a minute.
6. Slowly add vegetable stock while whisking and put on med until it thickens to the thickness of yummy gravy (about 3 min)
7. Add to the gravy mixture the corn, broccoli, spinach and carrot (unskinned). Make sure all are cut into bite sized pieces
8. When it is all together, cook for a few min until nice and thick.
9. Pour into a casserole dish, making sure to leave about an inch at the top. I had a little extra so I put it in little ramekins.
10. Spread the mashed potatoes on top as best you can. Mine was kinda more like clumpy biscuits, but its ok!
11. Bake in oven about 10 min until warm all the way through. This gives the veges a chance to cook a little!
Rating: 4 strawberries
Notes: So this is a mix between a chicken pot pie which uses a thick chicken stew and a biscuit crust on top and a shepherds pie which is a meat pie with mashed potatoes on top. It is also a vegetarian dish, so that is a nice twist. I have been wanting to make this for awhile, and it actually took a lot of motivation to get me up to make it (a little sleepy this afternoon after the best hike in marin ever…listened to pink floyd for an hour on a rock in the middle of a peopleless redwood forest). I was going to just not cook this, but when I ended up getting up and doing it, it took NO TIME at all, and I was back in the same spot on the couch with a warm treat in my hand. A great cold weather dish, and a great lazy day hand warmer. I would maybe cook the carrots and broccoli a little before...they were a little crunchy, but other than that it is so flavorful and just a great meal after a great day.
Day 51: This United Lasagna
Yield: 2 lasagnas
Time (Start to Finish): 1.5 hours
Ingredients:
1 pound lasagna noodles
1 carton brown mushrooms (2 cups)
1 med yellow onion
2-3 cups green apples (peeled and cubed)
salt and pepper
4-5 cloves garlic
olive oil
1 cup basil
2 1 pound jars pasta sauce
4 cups ricotta cheese
2 pounds mozzarella cheese, grated
2-3 cups fresh spinach
parmesan cheese for grating on top
Directions:
1. Preheat oven to 350F
2. Cook noodles in salted boiling water until cooked through but a little firm so you can move them. Place them aside but make sure they don’t stick together
3. In a big skillet pan, add chopped onion, apples, olive oil, salt and pepper and cook until tender.
4. Add the garlic and the mushrooms and cook just a little until the mushrooms are barely cooked
5. Add 1 jar of sauce and cook until it is not runny anymore, then add the chopped basil
6. In a separate bowl mix the ricotta, spinach and about 2 cups of the grated mozzarella until smooth
7. In 2 casserole dishes, place a little bit of the sauce on the bottom so the noodles wont stick.
8. Then add a layer of noodles
9. Add a layer of the ricotta cheese mixture (half of it)
10. Add a layer of the sauce
11. Add a layer of mozzarella cheese
12. Repeat by adding another layer of noodles, then the rest of the ricotta, sauce, mozzarella cheese, noodles, sauce.
13. If you need more sauce, there is the second jar. I used it for the last layer.
14. Make sure to end with mozzarella cheese. I made 3 layers of noodles.
15. Add parm cheese on top and bake in oven uncovered until cheese is melted and starts to brown
16. Let sit for at least 10 min before serving so it wont be runny, and serve with garlic bread
Rating: 4 strawberries
Notes: I made this dish for the lovely band These United States (link to their website at the bottom of this page). I know the name of my dish is cheesy, but so is my lasagna!! (and this joke) They stayed at my house and I wanted more than anything to make them feel at home and with no worries, so what better way then to fill the house with smells of garlic, onions, and cheese! The apple is my secret ingredient…well, Brent from years ago told me about the idea, and I now use apples in lots of things. Apples taste GREAT in things with tomato and for sure cut down the acidity and add a great sweetness and crunch! We scarfed this lasagna, and it fed about 9 people (most of them hungry boys) so if you are just making it at home, for sure cut the recipe in half. It freezes great, stores wonderfully in the fridge, and it really a classic recipe. I felt good filling the bands tummies and sending them off into the world. Nothing better than making people smile. Thanks guys! Oh, and thanks ninja girls for enjoying it too!
Day 50: Elvis Cookies
Yield: 1-2 dozen
Time (Start to Finish): 1 hour
Ingredients:
1 cup flour
¼ cup oats
½ tsp baking soda
4 Tbsp butter
½ tsp salt
1/8 cup vegetable shortening
¾ cup sugar
1 med banana
1 tsp vanilla
1 cup chocolate chips
1-2 cups peanut butter chips
Directions:
1. Preheat oven to 350F
2. In a mixer, mix the butter, shortening, and sugar until fluffy
3. Add the banana, cut into pieces, and vanilla and mix until smooth
4. Add the dry ingredients (flour, oats, baking soda, salt) and mix until just together.
5. By hand, add the peanut butter chips and the chocolate chips and mix until smooth
6. On a cookie sheet, place rounded spoonfuls of batter about 1-2 inches apart. The cookies will spread a little
7. Bake about 10-12 min or until very light brown. Cool and eat!
Rating: 4.5 strawberries
Notes: Thanks for the idea Lucy!!!!! My dear friend came into work with a batch of pumpkin cookies and told me she had a great banana cookie recipe. I tweaked it obviously, but what a killer idea!!! If any of you know Elvis, you know he liked fried peanut butter and banana sandwiches, so I just knew he would like these cookies, so I named them after him. These are great any time of day…even breakfast! Bananas are good for breaky right?? These can be made vegan too by not using butter but all shortening. Enjoy!!
Day 49: Cheesy Broccoli
Yield: 1 serving
Time (Start to Finish): 20 min
Ingredients:
2 lemons
1 cup broccoli
¼ cup mozzarella cheese
garlic salt and pepper
grated parmesan cheese
Directions:
1. Boil in a pot about an inch of water with one of the lemons sliced in
2. In a metal strainer that fits into the pot (without touching the water) put the broccoli
3. Put it over the pot and cover it to steam the broccoli in lemon water until the softness you want
4. Grate the mozzarella cheese
5. When the broccoli is done, take out and toss with garlic salt and pepper
6. Put on a piece of aluminum foil on a sheet pan and put the mozzarella and grated parmesan on top
7. Broil until the cheese melts and serve grated parmesean cheese and slices of lemon from the other lemon!
Rating: 4 strawberries
Notes: Just a classic delicious broccoli. I served it with a box of mac and cheese that was perfect! It takes no time and I ate it while watching family guy and sitting on the floor…like I came home from school! You must try this. It would go great with chicken and mashed potatoes also!
Thursday, September 17, 2009
Day 48: Parmesan Chips
Yield: 12 chips
Time (Start to Finish): 15-20 min
Ingredients:
1 cup parmesan cheese
1 tsp dried basil
Directions:
1. Preheat oven to 400F
2. Grate parmesan cheese into a bowl and add the dried basil. I suggest a thicker grating rather than a very fine one, but also, not shavings of it.
3. Put on a very well greased sheet pan or silpat in circles about one inch thick and about an inch or 2 apart.
4. Bake until turning brown and the center is cooked and then take out. Do not move from pan until cook so they can cool and harden. This takes about 10 min, but stay with them and watch them. Nothing worse than the smell of burnt cheese
5. Serve with hummus, dips, anything. The thicker you make the cheese, the sturdier the chips will be.
Rating: 4.5 strawberries
Notes: I give these a high rating because not only are they easy to make, but also when you bring them to a party everyone loves them and the next party everyone is making them. They are just so yummy to snack on and taste great. I served them with eggplant hummus from trader joes, my favorite. Enjoy them!
Day 47: Spa Water
Yield: 8-10 cups
Time (Start to Finish): 10 min + all day
Ingredients:
8-10 cups water
1 cucumber
10 mint leaves
2 cups strawberries
2 lemons
Directions:
1. Take a big pitcher or pot and put the water in it
2. Slice the cucumber into thin slices and place in the water
3. Take mint leaves, tear in half and put in the water as well.
4. Cover the water and put in the fridge for all day or over night. The longer it sits, the more flavorful it will be.
5. Take the strawberries and put in a food processer.
6. Add the juice of the 2 lemons and blend until smooth.
7. Put into an ice cube tray and freeze. Makes about 12 ice cubes
8. When serving water, add the ice cubes and enjoy!
Rating: 5 strawberries
Notes: I can’t think of anything more refreshing or delicious than this! A lot of spas serve water with slices of lemon or cucumber in it and it just makes you feel so good. This water makes you feel healthy and refreshed! After a day in the spa, I just thought it would hit the spot, and why not kick up the glory by adding mint and strawberries! The ice cubes melt and just continue to add more and more flavor. It gets a 5 because I can’t think of a way to make this better! It is just perfect, wonderful and delicious! You can add water too and it will just get better and better.
Day 46: Chocolate Peanut Butter Fudge
Yield: 24 pieces (1 casserole pan)
Time (Start to Finish): 30 min
Ingredients:
12 oz chocolate chips
1 ½ cup peanut butter
1 tsp vanilla
¾ cup butter
2 cups powdered sugar
1-2 cups peanut butter chips
1 cup toffee pieces
Directions:
1. In a double boiler (over a pot of boiling water) melt the chocolate chips, peanut butter, vanilla and butter.
2. In a separate bowl, sift powdered sugar. Also butter or pan spray a casserole dish
3. When the chocolate mixture is melted, add the vanilla and then pour into the powdered sugar.
4. Immediately stir until smooth and pour into the casserole dish. It will be thick, so work fast.
5. Flatten the fudge into the pan.
6. Sprinkle on top the peanut butter pieces and the toffee and press down with your hand so it sticks in
7. Put in fridge or in a cool place until it is solid and then slice! You can store covered or in the fridge
Rating: 4.5 strawberries
Notes: Today I was going to make a breakfast sandwich, but woke up to a message from my friends Trish and Casey and they asked I make them something sweet for when we went to wine country, so I thought fudge was perfect and quick! We brought it with us and it was a great snack while tasting champagne and taking mud baths! It was also placed on our table while interviewing potential new roommates. So good! It is creamy, quick, and just SO GOOD! I would maybe add chopped peanuts on top which is why I didn’t give it a solid 5, but trust me, you will LOVE this fudge!
Monday, September 14, 2009
Day 45: Dark Chocolate Walnut Cookies
Yield: 3 dozen cookies
Time (Start to Finish): 30 min
Ingredients:
½ cup butter
¾ cup brown sugar
1 egg
1 tsp vanilla
1 cup flour
¼ cup dark cocoa powder
¼ tsp cinnamon
1 ¼ cup walnuts
Directions:
1. Preheat oven to 350F
2. In a mixer, mix butter and sugar until creamy
3. Add egg and vanilla and scrape bowl
4. Sift flour, cocoa and cinnamon (important!!) and add to mixer. Be sure to turn mixer to low!
5. With hand spatula, mix the nuts in.
6. Roll into 1-inch balls and flatten onto baking sheet. Place 2 inches apart, they don’t spread too much.
7. Bake for 8 min or until the cookie stops being shiny. It’s hard to tell with chocolate, so feel free to touch or lift cookie. If bottom feels done, they are done.
Rating: 4.5 strawberries
Notes: They are So chocolaty and would be even better with a big glass of milk!! I made these for my friend Will who sent me my journal, and I mailed them to him. They pack really well and will last until he receives them, Thursday. My roomie travis scarfed the rest, and let me tell you, if I was home alone with them I would do the same. They are small enough to pop in your mouth, which is dangerous…because then you do! Enjoy these little trouble makers!
Day 44: Corn Chowda’
Yield: 2-3 servings
Time (Start to Finish): 30 min
Ingredients:
2 cups potatoes, cubed
½ yellow onion
3 garlic cloves
salt and pepper
olive oil
½ tsp cayenne
14 oz cream style corn
1 cup vege stock
½ cup half and half
½ avocado per serving
Directions:
1. Boil potatoe in salted water until soft but a little firm. and roughly mash them so there are chunks. I felt the skins on
2. In a skillet, cook onion until soft with a splash of olive oil, add garlic, salt and pepper and cook until done. Add to the potatoes.
3. Add the corn, and then veggie stock until it is thick but a little runny.
4. Add half and and cayenne. Taste, and add salt and pepper if needed. I added a lot of salt.
5. Heat until almost boiling.
6. When you serve, cut half an avocado into the bowl on the top of the soup and add a sprinkle of salt.
Rating: 4 strawberries
Notes: This was so spicy!!! Maybe add less cayenne, but lets just say, I have fought off any illness that has ever entered my body! It was a rainy gloomy humid day, and I thought what better than a big bowl of chowda’ and some crispy bread and a movie. You can for sure add chicken stock, and if you feel motivated, you can roast the potatoes with the onion and garlic. I wanted this quick, and so I just cooked the potatoes, but feel free to play. You can also add rosemary, or other spices. Its great for lunch the next day, and a sure hit for the roomies.
Day 43: Summer Storm Salad
Yield: 2 people
Time (Start to Finish): 10-15 min
Ingredients:
1-2 cups spinach
3 slices smoked turkey
½ green apple
4-5 strawberries
4 slices cheese (havarti)
¼ cup sunflower seeds
salt and pepper
olive oil
½ avocado
½ cup croutons
Directions:
1. Place spinach on the plate and dress with olive oil, salt and pepper. Not too much oil.
2. Cut into bite size pieces the turkey, apple, strawberries, cheese, and avocado
3. Toss altogether with the remaining ingredients and add more oil, salt and pepper if necessary!
Rating: 4 strawberries
Notes: There was a HUGE thunderstorm! It was magical and woke everyone in the house up. So to celebrate, I made a summer storm salad. Lots of crunch with the croutons and apple, and tons of bright colors (thunder and lightening) I used the croutons from last night, and the apple cuts the spice which is nice, but don’t work, that kick of cayenne still makes my eyes water…like rain! Anyways, it was quite lovely, just like this salad…
Friday, September 11, 2009
Day 42: Spicy Croutons
Yield: 2 cups
Time (Start to Finish): 20 min
Ingredients:
2 cups sourdough bread, cubed and decrusted
1-2 tsp cayenne pepper
garlic salt
pepper
1 tsp dried oregano
2-3 Tbsp grated parmesan cheese
olive oil to coat bread
Directions:
1. Preheat oven to 350F
2. Cube, decrust bread and put in a bowl
3. Pour olive oil over making sure to coat all the bread but not be soaked in it
4. Pour in salt, pepper, oregano, cheese and cayenne and mix with hand until well mixed. Taste one and season accordingly.
5. Spread on a baking sheet and put in oven. Cook for 5 min and then mix the cubes up. Continue until they are crispy
6. Store in a container on the counter.
Rating: 4 strawberries
Notes: ok, heres a tip, just because you cant see they cayenne doesn’t mean its not there. I added more, and they are REALLY spicy…but, I think itll work fine on a salad still (salad is coming tomorrow!!) They are so quick and easy to make, I wonder why people buy them. And you can make them just how you want. These will go great in a salad tomorrow, and were awesome to snack on while making mac and cheese! Just go easy on the cayenne! So here it is, all up to date on the blog. THANK YOU WILL for sending my recipe journal!!!!!!! You are the best!!!! Expect a mailed treat soon! We are all up to date and back on track with blogging as often as I can. Phew! First real hurtle over!! I cant believe its been 42 days by the way…go me go!
Day 41: Jimmie’s Breaky Potatoes
Yield: 2 servings
Time (Start to Finish): 25 min
Ingredients:
3 med yellow potatoes
2 garlic cloves
1-2 sprigs rosemary
olive oil
garlic salt
pepper
Directions:
1. Heat pan to med-high
2. Cut potatoes into bitesize pieces, and leave skins on. About 1 inch square.
3. Place a couple Tbsp olive oil in the pan and heat up. Not too much or you will make the potatoes oily. 2-3 Tbsp.
4. Coat potatoes with garlic salt and pepper and throw into pan.
5. Cook until about half way done and then throw in the garlic, chopped up
6. Add more garlic salt and pepper to taste, and when they brown and get to the crispiness you like, throw in the chopped rosemary.
7. Cook for a few seconds and remove from heat! Serve with eggs or any breaky item
Rating: 4.5 strawberries
Notes: I made this perfect if I must say so. Not too crispy or too soft and the seasoning I just nailed. If I may quote my roomie Travis, ‘if I went out to breakfast and got these, I would be so psyched.’ People throw too much into their potatoes, just let it be simple!!! Jimmy is a restaurant in Hawaii we used to go to all the time when I was growing up. They actually used basil, which would be a great sub for the rosemary, but I liked the rosemary today. Make them and serve them strong. They sent me off to work in a good mood.
Day 40: Sammy
Yield: 1 sandwich
Time (Start to Finish): 10 min
Ingredients:
1 french roll
3 slices smoked turkey
butter, soft
½ avocado
3 slices havarti cheese
2 slices heirloom tomato
salt and pepper
Directions:
1. slice French roll in half and butter the sides. I know, most people like mayo and mustard, but sorry (mainly you Ross!) I don’t like those on sammy’s, I like butter…much be the English in me…)
2. place the turkey, and cheese on
3. in a bowl mix up the avocado and spread on the bread. Add salt and pepper, then the tomato.
4. Put together, cut in half and serve with potato salad of your choice!
Rating: 4.5 strawberries
Notes: After a long tiring car trip home, I struggled to find the energy to make something, and yes, a sammy came out of it! This is one of my feel good meals, and after a morning of eating energy bars and coffee drinks, I needed something light, fresh and yummy. Plus, with going out later, I needed a charge. This was just the ticket…pulled me out of a grumpy mood and onto cloud 9…who could ask for more? This sammy would be good with grilled garlic bread, and if you need to add mustard, fine, just don’t eat it near me!
Day 39: Strawberry/Banana Crepes
Yield: About 8 crepes
Time (Start to Finish): 20 min
Ingredients:
1 cup flour
2 eggs
1 cup milk
¼ tsp salt
2 Tbsp melted butter
½ tsp cinnamon
syrup
whipped cream
strawberries
bananas
Directions:
1. In a bowl, whisk all ingredients (NOT syrup whipped cream or fruit) and set aside.
2. Heat a skillet with a flat area to med heat.
3. Make sure pan is greased and have some type of flipping divice, a fork or knife handy
4. Pour about ½ cup batter into the pan and swirl pan around so it is as flat and round as possible. When it starts to be less battery and cooked on one side, take fork and flip crepe with your hand. The fork is just to get a corner up and use hands to flip. It will be hot so do it fast!
5. Take off the heat and repeat, making sure each time the pan is greased. You also want to not make the crepes brown very much. This whole process takes about 2-3 min.
6. When they are done, place in a big stack. Take a crepe, fill with fruit, cream and syrup and serve about 3 per person
Rating: 4 strawberries
Notes: I made these with my main squeeze Vinny while in LA. I have known him since high school, so 10 years or so, and I was staying with them. It was fun to use a different kitchen, and wake up in their house and say, I need to cook something, what do you want? Vinny picked crepes and they were great. I gave them a 4 because they were yummy in my tummy, but they could be made better with honey and some lemon on the fruit. Thanks for helping me cook, Vinny, and thanks Will for letting me stay with you guys…you are the best friends a girl can have (Will I have known each other since high school too…2 of my closest friends to this day…) Note to self: Always bring cinnamon when you travel Annie. That stuff is not cheap and no one has it in their cupboards…
Day 38: White Cheddar Sage Grilled Cheese
Yield: 1 sandwich
Time (Start to Finish): 5-10 min
Ingredients:
2 slices sourdough bread
4-5 slices white cheddar (sharp)
3 sage leaves
1-2 Tbsp butter, soft
Directions:
1. Take skillet and heat to med
2. Butter one side of each of the slices of bread
3. Chop up the sage into fine pieces
4. Place cheddar on one slice, sprinkle the sage on, place the other bread slice on, butter sides out and put on skillet
5. Flip when the bread browns, and then remove from heat when both sides are cooked
6. Slice in half and enjoy!
Rating: 4.5 strawberry
Notes: This is another recipe that is all about the ingredients, so make sure to get quality bread and cheese, and fresh sage. I ate this at 6am while driving down the 5 to visit friends and family, and I thought for sure I wouldn’t be wanting to eat it. The second I took a bite though I ate the whole thing! It was SO good! Sage and white cheddar is a great combo! I think it would be better when just off the grill, and it is a powerful flavor, so a light drink and maybe some plain chips, but such a good sandwich...and perfect with a sunrise!
Day 37: Chocolate Frosting
Yield: 2 cups (double for frosting a cake)
Time (Start to Finish): 10 min
Ingredients:
2 Tbsp butter
2 Tbsp cream cheese
½ cup cocoa powder
2 ½ cups powder sugar
1 Tbsp vanilla
3-4 Tbsp half and half
Directions:
1. Make sure butter and cream cheese are room temp
2. Sift powdered sugar and cocoa into a bowl
3. Mix butter, cream cheese, sugar, cocoa, half and half and vanilla until smooth and creamy. You can add more half and half, but add just a little at a time. If it gets too runny, add more powdered sugar.
4. Frosts 1 layer of cake, so double if making a full cake
Rating: 4.5 strawberries
Notes: Happy Birthday Jeff and Kendra!!! It is both of their birthdays, and I made them a lemon cake with chocolate frosting, which is my brother’s birthday cake since he was a kid. I drove it down to LA for them and they loved it! The frosting was just perfect for the cake, a tad grainy I think from not stirring enough, but all in all perfect, and I know made my brother happy! And, it travels super well! Just keep out of the sun!
Day 36: Mint Chocolate Truffles
REAL Truffles
MY truffles
Yield: 3 dozen truffles
Time (Start to Finish): 2 hours
Ingredients:
10 oz Choc Chips (almost a full bag)
½ cup heavy cream
1 Tbsp butter
1 Tbsp peppermint oil
cocoa powder (for rolling)
Directions:
1. Put chocolate chips and mint oil in a bowl and set aside.
2. In a sauce pan, heat the milk and butter until just reaches a boil
3. Pour hot cream over the chocolate chips and stir with a whisk until smooth. Taste and add more mint oil if you want.
4. Place bowl in freezer for 20 min. stir with a spoon. Continue until it reaches the consistency of play dough.
5. Take out of freezer. In a separate bowl place cocoa powder.
6. Take dough into hands and roll into 1 inch balls and then roll in the powder. Do this quickly because as you see it will melt in your hands. They do NOT need to be perfect balls as real truffles are not perfect.
7. Place back into freezer or fridge and store until ready to eat! Can freeze up to a month, but always bring to room temp before serving.
Rating: 5 strawberries
Notes: I don’t think anything is better than mint and chocolate (well, maybe strawberries and chocolate) These are SO GOOD and so easy to eat. Great for after dinner or bringing to meet someone’s parents. Here’s a bit of info you can spread along. A REAL truffle is a mushroom found in france and spain.(there is a picture of it above!) It is buried deep under oak and beech trees and is very hard to find. They train pigs to find them actually! (I guess dogs eat them when they find them) they look like lumps of dirt, hence the chocolate truffle looking like a lump of dirt. They are VERY expensive, and taste very earthy…I like them. So that’s the facts!! Now onto me: These took no time to make and made no noise to wake the sleeping roomies. They are going to be great to give to Sarah who is visiting, and a few to my mom when we go to farmers market today.
Thursday, September 10, 2009
A slight setback..
hey all, the project is going perfectly and my trip to LA was short and sweet, but it must be known i left my recipe journal in my friend Will's kitchen...i blame the crepes i made for being too delicious to remember anything else...what this means is until I get it back (bless will's heart for mailing it to be) i cant post....it has a few backdated recipes. once i get it, though, this site will be bombarded with treats and your minds will be blown!!! but...until then...you will live in the mystery...what did she make??? are they all 5 strawberries??? the suspense will drive you wild! so enjoy the suspense while you have it, and ill patiently wait for the mail every day...maybe ill cook something to pass the time...
Monday, September 7, 2009
Friday, September 4, 2009
Day 35: Blueberry Peach Buckle
Yield: 1 8’’ pan
Time (Start to Finish): 1 hour 20 min
Ingredients:
½ stick butter
¾ cup brown sugar
1 tsp vanilla
1 egg
2 cups flour
2 tsp baking powder
1 tsp salt
½ cup heavy cream
1 pint blueberries
1-2 peaches
½ stick butter
½ cup brown sugar
1 cup flour
1 tsp cinnamon
Directions:
1. Preheat oven to 375. Grease baking dish.
2. In a bowl, mix soft butter and sugar until smooth, about 3 min.
3. Add vanilla and egg and mix until also smooth
4. Mix flour, baking powder and salt and ½ of it to the egg mixture.
5. Add the milk
6. Add the rest of the flour.
7. Cut peaches into same size as the blueberries and dust all fruit with a little flour and mix into batter (I used my hands so not to break the blueberries)
8. Put into the pan and flatten.
9. In another bowl mix butter, sugar, flour and cinnamon and mix with hand until together. Crumble on the top of the batter.
10. Bake for 1 hour. At about 40 min, check and if its brown on top, cover with foil. Bake until knife comes out almost clean. You don’t want it to be dry.
Rating: 4.5 strawberries
Notes: Its cloudy and cold this morning, and I woke the roomies with smells of berries and bread…not too bad! This is so good! And it is almost time to say goodbye to blueberries for the year, so I bought a ton! This bread you can add strawberries, raspberries, anything really. Its quite delicious and comforting and goes perfect with a big cup of tea and a few episodes of I Love Lucy (my favorite show) The crumbles on top were a tad sweet for me, I even thought of adding some nuts, but still this is an almost perfect dish.
Thursday, September 3, 2009
Day 34: Walnut Peach Oatmeal
Yield: 2 people
Time (Start to Finish): 20 min
Ingredients:
¾ cup steel cut oats
2 ½ cup water
½ tsp salt
½ cup ground flax seeds
½ cup toasted walnuts
¼ tsp cinnamon
2-3 Tbsp whipping cream
1 peach, perfectly ripe
Directions:
1. Heat water in a saucepan with the salt.
2. When water boils, add the oats and stir lower temp. stir until the thickness you like, I like oatmeal thick.
3. Add the flax, cinnamon and cream and stir
4. Add the peaches and toasted nuts (toast them in a pan on the stove over med heat just until they are warmed through.
5. Serve with a hot cup of tea or a nice piece of toast with honey.
Rating: 4 strawberries
Notes: Such a classically perfect Annie Breakfast. I love my oatmeal and especially love steel cut oats. The flax adds a touch of healthiness as well ad heartiness. The steel cut oats also make it heartier and takes maybe 5 min more than regular oatmeal. The peaches are in season (which is why a lot of my cooking has used them) and it’s a dish that sticks with you all day. Plus it makes the house smell warm and homey. Not much to report this morning. The sun is pouring through the windows; can you see the steam coming off the oatmeal pic?
Wednesday, September 2, 2009
Day 33: Cran-Watermelon Mint Cocktail
Yield: 1 person
Time (Start to Finish): 10 min
Ingredients:
1-2 oz vodka
1 cup cranberry juice
2 mint leaves
3-4 watermelon cubes (freeze watermelon juice in an ice cube tray with a little lemon juice)
Directions:
1. Take a watermelon and blend it in a blender. Strain the juice out and mix with a little lemon and put in ice cube tray and freeze. I actually used left over watermelon granita, which is pretty much the same thing.
2. Mix all ingredients in a glass on a hot summer day and enjoy!
Rating: 4.5 strawberries
Notes: So good!!!! Was a creation with helps from Maggie and Travis; it is so so good and refreshing and tasty! I could drink them all night. It’s a hot day, so it is a perfect drink, and a great way to get rid of the left over frozen granita, which is still yummy. The mint adds just the right kick, and it really is something you can keep drinking and get yourself in trouble. Remove the vodka and kids will run for it!
The Rating
0 Strawberries: Not Edible. NOT NOT MAKE THIS
1 Strawberry: Was horrible, don't make it, im sure it can be made better, but not at all what i was going for
2 Strawberries: Not what i thought it was going to be. The flavors dont work that well together, is soggy, or just not at all what i had in mind. I know what to do to fix it though, and maybe will try again, but this just didn't work
3 strawberries: tasty, edible and servable, but for sure can be made better. its missing something, or isnt cooked exactly right, but something ill still eat the plate of. I know how to impove it, and its still fine how it is, just not mind blowing
4 strawberries: This is pretty wonderful. its got a ton of flavor and is incredible. something you wouldnt have thought of, or had, and is executed very well...still...its not perfect. can be tweeked to be made even better, maybe cooked longer, a squeeze of lemon, or something, but is really killer how it is
5 strawberries: perfect. I wouldn't change a thing. I nailed it...this recipe is going down in history
Month 1
Month 1
Annie’s Current Weight: 131 (lost 1 pound??!)
Pleasures: This month had been incredible. The first month in my project, and things are going great!!! I have not for one second not felt like getting up and cooking and have been each and every day more and more motivated! I feel like this month I have gone a safe route, but feel like I threw out a ton of great creative recipes. I have fattened up my roommates, I have learned there is a thing called mascarpone, which is the best thing ever, and I have grown to the point where people stop asking how I am and ask what I am cooking today. I feel like I have spread the word about my blog a lot and have a nice intimate following, and the more people hear about it, the more psyched they are! I haven’t gained any weight, which is great, and so far I have been able to afford all the food I have been buying! Really, this month has had a lot of positive things, and I am more and more psyched for the ideas I have yet to come!
Pains: I have a few down parts about this month, but things I have learned for sure. I have to work harder on portion; I have had to throw away a few things. Not a ton, but I know if I tone it down it will be better on my budget and on waste. Also, I fear I am too loud in the morning sometimes, waking the roomies, and so far I have been able to temp them with waffles and pancakes, but I dread the day my noise will wake them and I have salad dressing...not so pleasing at 8 am. My photos haven’t been as quality as id like, and I hope to improve those as time goes on, and some of them just don’t give the food justice. Also, in stocking up on supplies, I am running out of space on my shelf! I need to organize it better and try harder to use the things I have until they run out instead of going bad.
Promises: I promise to really try hard to not throw food away and have good portions and good organization. Also, I want to collaborate more than I have. My friends have great ideas, and cooking with others around is so much more fun. I have such a great support group, I really want to include more instead of getting up early and cooking alone before the day begins, although I do like that sometimes.
Ponders: I have a ton of great ideas, like theme weeks. Maybe a color week, each day a different color, or band names, I have a whole menu for a meal with band names, maybe bust that out. Also, more pictures with more interaction, instead of just what the final result is. I also want my blog to have more talk about how the cooking went, not just the recipe. Plus, a lot more use of seasonal things. I have been pretty good, but I can always do better.
Plus: So that is my update! This first month rocked and has been everything I have wanted. I have learned a lot and feel like this next month the blog will rock even harder!!! I look back and I think, wow, I have come far in one month, I cant wait to see where I will be in 12!! Stay with me folks, I got a lot more recipes you wont believe, and as always, come cook with me!! The more the better!
Day 32: Mushroom Spinach Risotto
Yield: 4 people
Time (Start to Finish): 45 min
Ingredients:
½ med yellow onion
3 cloves garlic
3 Tbsp olive oil
1 cup Arborio rice
salt and pepper
½ cup parmesan cheese
4 cups vegetable stock
¾ cup white wine (I used Riesling)
2 ½ cup cremini mushrooms
2 ½ cups spinach
2 Tbsp olive oil
Directions:
1. In a sauce pot, heat up the vege stock until almost boiling
2. In a bigger pot, heat olive oil, onion (chopped) and garlic (chopped) until onions and garlic are sweating
3. Add rice and cook for about a minute to make sure rice is coated with oil over med heat
4. Add 1 cup of stock and stir until it is almost all evaporated
5. Then add the wine and stir until almost evaporated
6. Add stock one cup at a time until rice is cooked and it is creamy and thick. Make sure to wait until it is all evaporated before adding more stock. Add salt and pepper to taste and a little more wine if necessary. Not too much salt, the cheese is salty. This takes about 20-25 min.
7. In another pan, heat olive oil and cook mushrooms and spinach both chopped to how you like them and cook until almost done, about 3 min
8. Add cheese to the rice and taste, and then add the vegetables. Stir and serve with good bread and wine!
Rating: 4.5 strawberries
Notes: Happy 1 month!!!!!!!!!! My next post will be stats and facts, but lets talk about this dish. I figured on my one month I should make my favorite food, risotto. This is also my first collaborative, with the lovely Travis Weller (travisweller.com) You can add any veggies and any wine, or even leave the wine out. Risotto is much easier to make than people think, and not only is it my favorite thing to eat, but it uses my favorite cooking tool, a heat resistant spatula, and my favorite technique, stirring. It takes a lot of stirring, so it both tests patience, and helps one relax after a long day. Cellar #8 is the best winery for reds I have ever founds. Their zin is incredible as well ad merlot and can sav. You must try them. We also had a big loaf of crusty olive bread. A meal fit for kings…cook on my lovelies…